Importing Epos Now products into WooCommerce
This guide is for businesses that want to export product data from Epos Now and import it into WooCommerce in bulk.
There are a few things to be careful with when doing this, and we will outline them here along with our recommended process.
Export products from Epos Now
To export products from Epos Now, there are 2 options.
1. The Epos Now Back Office
You can use the Bulk Import app from the Epos Now app store.
EposNow have an export feature built into their product listing page (EposNow back office > Manage > Products > Product List), but this sometimes strips out the leading zeros from barcodes, so if you use barcodes, then we recommend using the Bulk Import app.
- Open the Bulk Import app
- Select the product update template and select All Suppliers from the dropdown list
- This will download a CSV file with all the EposNow products
2. The Product Linker
You also have access to our product linker (login to the Slynk Dashboard to access) and this can be used to export all the products from the Epos Now side with all the relevant fields. We recommend having a look at this KB article: How to use the product linker.
Editing the CSV file
If you need to edit the CSV file, we do not recommend opening the file directly in Excel. Excel will strip out any leading zeros from Barcodes and other fields.
To open the file safely in Excel:
- Open Excel
- Open a new workbook
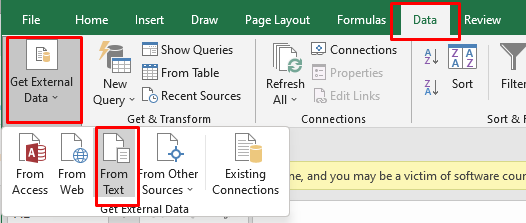
- Select Data > Get External Data > From Text
-
Select the data type as delimited (newer versions of Excel will detect this automatically)
-
Tick the box for My data has headers (newer versions of Excel will detect this automatically)
-
Select the delimiter as Comma
-
On newer versions of Excel, you will need to click on the transform data button
-
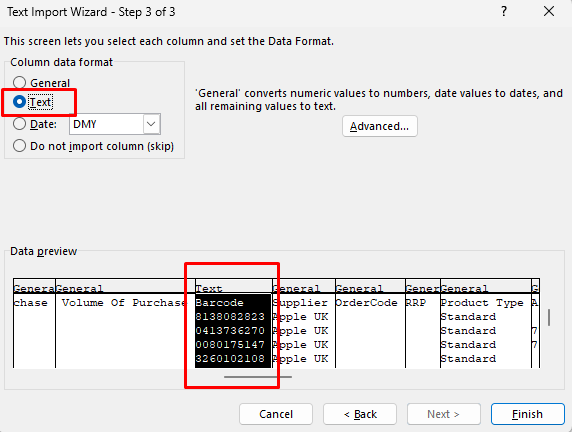
Select the columns which have leading zeros (e.g. barcode) and set the Column data format as Text.
-
On newer versions of Excel, this screen will look slightly different to the screenshot below, but all you need to do is select the column and set the format as text (shown as an ABC icon)
-
Click on Finish/Import and you will now have proper data in Excel. We recommend saving this as an XLSX file so that you easily edit again without going through this same process again for this same download.
-
If you download a new CSV from Epos Now, then you will have to go through this process again.
-
You can now edit the file as needed and save it as an XLSX file
Importing the data into WooCommerce
At the time of writing, the built in WooCommerce importer has some limitations:
-
You must set a positive stock level for each product in the import, otherwise WooCommerce sets the manage stock property to false which means you cannot set a zero stock level.
-
If manage stock is not set, then WooCommerce will not track the stock level for that product.
-
More information on the columns required for the default Woo import are here: WooCommerce Product CSV Import Suite Column Header Reference
-
The export from EposNow only contains the product data, not the stock levels so if you used the built in importer, it would set the manage stock to false for all products.
Our recommended plugin to import into WooCommerce is WP All Import. This is a premium plugin but is very configurable and you can be very selective about the data that should be imported. It also does not require you to change the column order or column names in the Excel file.
We recommend following this guide from WP All Import on importing WooCommerce products.
These are some of our suggestions for setting up WP All Import:
1. Create separate import profiles
Create one import profile for creating products and another for updating products.
You can still use the same import file for both, but splitting them like this makes it much easier to control what should and should not be updated.
2. Configure the create profile
For the create profile:
- set the profile to create new products only
- map the fields from the EposNow export to the relevant WooCommerce fields
- tick
manage stock
We recommend importing the EposNow fields into the WooCommerce meta fields available on our plugin. A full list of the meta fields available can be seen in this KB article.
3. Configure the update profile
For the update profile:
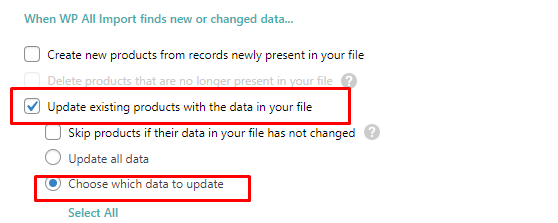
- set the profile to update existing products only
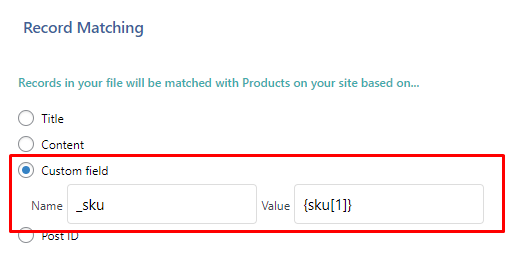
- set how WP All Import should identify a product
In this example, we would use the EposNow SKU field to match to the Woo SKU field, but you should change this to reflect your matching criteria.
4. Choose which fields should be updated
Set only the fields that should be updated.
This ensures that all other fields remain untouched.
You can now use the same file to run:
- the create profile, which will create any new products
- the update profile, which will update existing products
We recommend that you take a backup of your WooCommerce database before running the imports just in case you need to roll back.